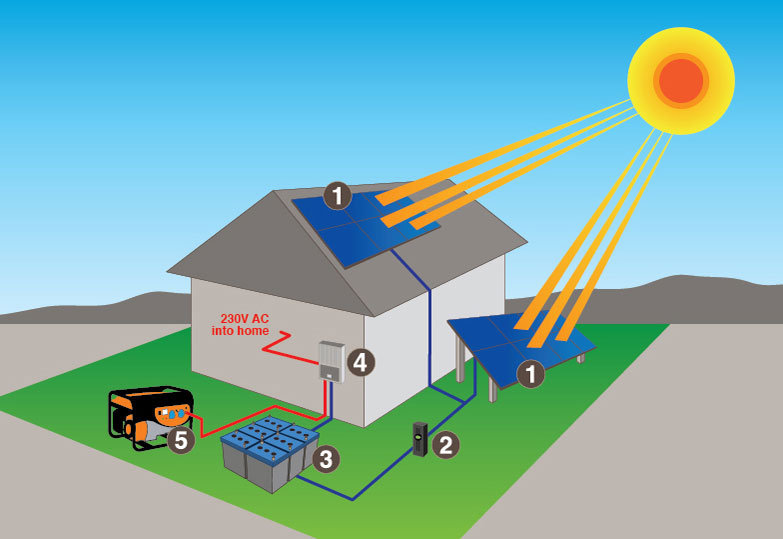
Off-grid solar systems are completely independent of the power grid. You can also refer to them as independent solar power or stand-alone solar power.
What this means is that with off-grid solar systems you will not need backup power from power companies.
You can only use what your solar energy system produces and what you have stored in your battery bank.
Because off-grid solar energy systems must do not have backup power, they typically have much bigger battery banks than grid-tied solar systems with a battery backup.
Benefits of the off-grid solar system
The use of this type of solar energy system comes with its own advantages too.
- Avoid Power Outages: No more fears of power outages. Off-grid solar energy systems are reliable for outage situations. These systems store energy even when for some reason the power company is unable to supply electricity.
- Reduced electricity costs: Off-grid solar systems rely on sunlight to provide the power you need. As a result, this adds nothing in your monthly electric bills.
- Easier Installation: By using simple tools, a homeowner can install a solar off-grid system on their own. This can help reduce the overall system cost substantially.
- Easy Alternative for Rural Areas: Rural and remote areas usually have fewer infrastructures. Therefore, connecting them to the main electrical grid can be a challenge and incredibly costly. But by using off-grid solar energy systems, one can offset this significant role. With sponsorship, one can build a solar mini-grid system in a rural area.
- Keeping the Environment Clean and Green: Renewable energy sources such as off-grid solar-powered systems minimizes carbon footprint that keeps the air and environment clean. Using off-grid technology helps to provide electricity and also reduces your consumption of fossil fuels. Also, this will help minimize the negative impact on the environment.
How to set up an off-grid solar system
Now that you know some benefits of the off-grid solar system, you are welcome to think about building one immediately.
However, there is an issue.
No one wakes up one morning to start installing an off-grid solar system without having prior knowledge of what to do.
That is, in fact, the exact reason for this article.
If you want to design a system like this one, you are welcome to use the steps in this article.
Here are the 6 steps to get you started.
1. Figure out how much power you need
This is the most important step in this process, and many people try to skip over it. Don’t be like many people who go by assumptions.
You must sit down and calculate your power load before choosing the components you need for installation.
This calculation will help you determine how much time your solar off-grid system will run.
You’ve got to remember absolutely everything that will be powered by your system.
Any little change in your calculation can make a big difference.
With a basic knowledge of mathematics, you can do calculations very easily.
- Decide what appliances (bulbs, AC, fan, TV, etc ) you want to run and how much time (hours).
- See the specification chart in your appliances for power rating.
- Calculate the Watt Hour which is equal to the product of the power rating of your appliances and run time (hours). Load Calculation Example: Let’s say you want to run a 50W Fan for 4 hours from a solar panel, then the watt-hour is equal to (CFL) for 5 hours from a solar panel, then the watt-hour is equal to; Watt Hour = 50W x 6 hr = 200
- Calculate the total Watt Hour: Just as with the fan you’ll now calculate the watt-hour for other appliances in your home and add them together. Example: compact fluorescent lamp (CFL) = 11W x 7 hr = 77; Fan = 50 W x 4hr = 200; TV = 80W x 3hr = 240
Total Watt Hours = 77+200+240 = 517
If you have more than one appliance of the same kind, you can multiply the watt-hour for that appliance by the number available.
Now that the load calculation is over, the next thing is to choose the right components to match your load requirement.
Note: If this process is too much maths for you to do, you can just key in the appropriate numbers in this load calculator. There are many other load calculators available on the internet that will serve the same purpose.
2. Calculate the number of batteries you need
Now that you know how much power you need, you need to figure out how many batteries you need to store it.
- Do you need only enough storage for a day or two?
- Is there a need to have enough batteries to store 3 or 4 days, or more, worth of power?
- Do you have another power source, like a generator, that will kick in if the sun doesn’t shine?
- Will you be storing the batteries in a warm room or will they be in a cold location?
Batteries are rated for storage at around 80 degrees Fahrenheit. The colder the room, the bigger the battery bank you need – by over 50% more for below-freezing. Each of these answers affects the size, and cost, of your battery bank.
What voltage battery bank do you need for the off-grid solar system – 12V, 24V, or 48V?
Before you go to choose the components for installation, you must decide your system voltage, 12V, 24V, or 48V.
The higher the voltage, the lesser the current and the lesser the copper loss will be in the conductor.
This will also reduce your conductor size. Most of the small home solar systems will have 12 V or 24 V.
On the other hand, the larger the system, the higher the voltage battery banks are used to keep the number of parallel strings to a minimum and reduce the amount of current between the battery bank and the inverter.
If you are just owning a small system, and want to be able to charge your cell phone and power 12V DC appliances in your RV, then a basic 12V battery bank makes sense.
But if you need to power much more than 2000 watts at a time, you’ll want to consider 24-volt and 48-volt systems.
Besides reducing how many parallel strings of batteries you’ll have, it’ll allow you to use thinner and less expensive copper cabling between the batteries and the inverter.
3. Calculate the number of solar panels needed for your location and time of year
Using the off-grid calculator from the previous step, you can also figure out how many solar panels you’ll need for your solar system.
After knowing how much energy you need to make per day from the load calculator, you’ll need to tell it how much sunshine you’ll have to harvest.
This available energy from the sun for a location is referred to as “sun hours.”
The number of “sun hours” is how many hours the available sun shines on your panels at an angle throughout the day equals sunlight, as if it were shining directly on your solar panels when they get the most power.
As you know, the sun isn’t as bright at 8 AM as it is at noon.
So, an hour of morning sun may be counted as half an hour, whereas the hour from noon to 1 PM would be a full hour.
Unless you live near the equator, you do not have the same number of hours of sunlight in the winter as you do in the summer.
You want to take the worst-case scenario when determining the available energy from the sun for your area.
The best option is to choose the season with the least amount of sunshine or sun hours.
That way, you do not end up short on solar energy for part of the year.
4. Select a solar charge controller
Now that we have the batteries and the solar panels we need, the next requirement is a way to manage the transmission of power from the solar panels to the batteries.
A solar charge controller is a device that is placed between a solar panel and a battery.
It regulates the voltage and current coming from your solar panels.
It is used to maintain the proper charging voltage on the batteries.
As the input voltage from the solar panel rises, the charge controller regulates the charge to the batteries preventing any overcharging.
An extremely rough calculation to figure out what size solar charge controller you need is to take the watts from the solar, and divide it by the battery bank voltage.
Then you add another 25% for a safety factor.
Types of Charge Controllers:
Now there’s a bit more to consider with selecting the charge controller. These are the 3 main types of charge controllers;
- ON OFF Charge Controller
- PWM Charge Controller
- MPPT Charge Controller
As much as you can, try to avoid the ON/OFF charge controller as it is the least efficient type.
Among the 3 charge controllers, MPPT has the highest efficiency but it is also relatively more expensive than the others.
So, if you are to select a charge controller, you can use either pick the PWM or MPPT.
Here are some tips to help you determine the exact charge controller to use.
- If the voltage of the solar panel array matches the voltage of the battery bank, you can use a PWM charge controller. For instance, if you have a 12V panel and a 12V battery bank, then use PWM.
- If your solar panel voltage is different from the battery bank voltage, and can’t be wired in series to make it match, you need to use an MPPT charge controller. In essence, if you have a 20V solar panel and you have a 12V battery bank, you need to use an MPPT charge controller.
5. Select an inverter
Now that we have efficiently charged batteries, we need to make the power usable. If you are only running DC loads straight off your battery bank, you can skip this step.
But, if you are powering any AC loads, you need to convert the direct current from the batteries into an alternating current for your appliances.
Solar power systems work by first receiving sun rays on the solar panels (PV) which converts the rays into direct current (DC) electricity.
Then, you use a device known as an inverter to convert the DC into alternating current (AC).
AC electricity circulates through every outlet of your home, powering all the appliances.
Inverter Types
There are three main types of inverters for solar installations.
- Square Wave
- Modified Sine Wave
- Pure Sine Wave
Square wave inverters are the cheapest but they are not suitable for all appliances.
The Modified Sine Wave inverter output is also not suitable for certain appliances, especially those with capacitive and electromagnetic devices such as fridges, microwave ovens, and most kinds of motors.
Typically modified sine wave inverters work at lower efficiency than pure sine wave inverters.
So, if you are to choose an inverter for your off-grid solar system, I will urge you to choose a pure sine wave inverter.
The inverter may be grid-tied or stand-alone. In our case, it is obviously stand-alone and completely off-the-grid since we are working on an off-grid solar system.
It is also very important to know what type of AC power you need. In North America, the standard is a 120/240V split-phase, 60Hz.
In Europe and much of Africa and some countries in South America, the AC power requirement is 230V single 50Hz.
Some inverters are configurable between voltages and/or frequencies, while many have fixed values.
So, you need to carefully check the specs of the inverter you are purchasing to make sure it matches your needs.
Rating of Inverter:
The rating of the inverter you are going for is also an important metric to consider.
The power rating should be equal to or more than the total load in watts at any instant.
Luckily, way back in step one, you created a loads list that figured out both the constant watts and surge requirements of your loads.
From our example, the maximum load at any instant = CFL (11W) + Fan (80W) + Tv (50W) = 141W
By taking some margin we can choose a 200W inverter.
As our system is 12V we have to select a 12V DC to 230V/50Hz or 110V/60Hz AC pure sine wave inverter.
Please note that an inverter is designed for a specific voltage battery bank, like 12, 24, or 48 volts.
So, you need to know what voltage battery bank you are going to have before you settle on the inverter.
Keep this in mind if you have plans of expanding your solar power system in the future.
If you plan on having a higher voltage battery bank later, be aware that the lower voltage inverter won’t work in the new bigger system.
Therefore, you can either plan ahead and go with a much higher voltage from the start or plan on changing out your inverter in the future.
6. Balance of system
Much of the work you require to build an efficient off-grid solar power system has been explained in steps 1–5.
In this final stage, all that is left for you to do is mount the solar panels in such a way that they will always receive sunlight.
To achieve this, you need to slant the solar panels at an angle and fasten them to your rooftop or in your backyard.
The next is to run a series and parallel connection of the batteries, build the inverter and battery stand and then complete the wiring.
To balance the system, you should look into these little components:
- the fuses and breakers for overcurrent protection
- what breaker boxes will be used
- what size wire you will need
Conclusion On Off-grid Solar Systems
Once you’ve gone through these 6 steps, you’ll be off and running to design your own DIY off-grid solar system.
Experience the benefits of solar-powered systems that solve all your energy problems.
GVE Projects Ltd is dedicated to providing the most reliable, affordable, and accessible solar lighting and power systems. Check out our services page today to see how we can provide you with constant electricity to power your home.